Search This Blog

Translate

Thursday, March 19, 2015

I was featured: Vintage Blog of the Week and Wooden cobbler boot collection

http://dpetrillo.blogspot.com/2014/10/vintage-blog-of-week-my-thrift-store.html 


Diana from Adirondack Girl @ Heart emailed to say she had chosen my blog to be featured on her  Vintage Blog of the Week


Oh my, was I ever surprised, thrilled and a little nervous
 wondering what in the world could she say about me that would be interesting. 
I did not feed her any information ... well, I did give her my age. 
She just snooped around in my blogs and I will say, 
she is good and she is a talented writer.
  What she does requires a lot of time! 

I am really impressed with Diana.
  Thank you Diana for featuring me! 
Hope you will pay Diana a visit. 
She has a lot to share.
**************************************************************
 

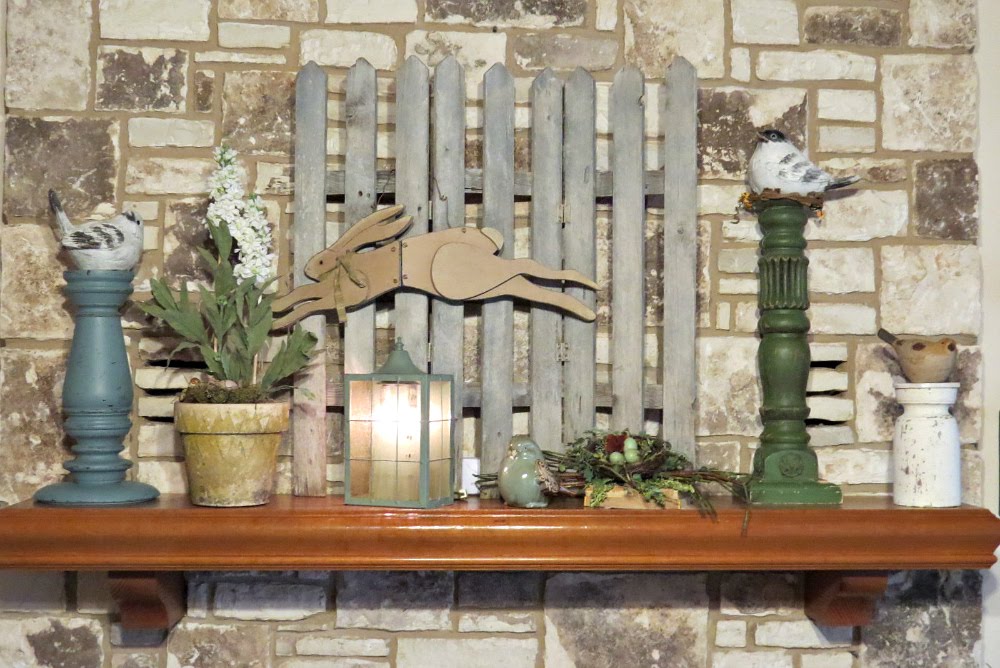
I love all things wooden.
Here is a quick peek at some interesting wooden cobbler forms
I thrifted recently. 

Vintage wooden English riding boot form for keeping the shape or stretching. (sold on eBay)
19" tall


I tied them together with leather string 
because they do not fasten together. 
 
Four pieces ... front, back, foot and stretcher. The pieces are dovetailed to fit together. The middle piece with the ring on the top is the stretcher.
This is pushed between the back and front to stretch the boot or keep it in shape. The form will fit together without the center piece
Not sure this is totally correct, but that is how I see it.
This is a pair of short boot cobbler forms. They work the same way as the tall boots. The toe part and the front (shin part) are hinged together. The stretcher part slides in between them to stretch or shape.
(sold on eBay)


Size 9


one center part is missing in the photo below.


 Unusual stretchers or keepers for ladies high heel shoes. The rod will screw down to stretch the toe of the shoe or keep it in shape. Sometimes called shoe trees.       


Common Cobbler's shoe forms.  
 

 HIKER 
  May 5 1952

8 D

 Square toed baby shoes.
VULCAN 1 56
one is marked 4A and the other 4½A

Do not know what 66 means.

4124 child shoe
13½ C
marked Empire Branch
U. ?  Co.
ROCHESTER
NOV  1945


Baby high-top 


Adult shoe form
marked 23.

Tole painted with strawberry and flower vine.


Thanks to all of you for visiting and for your sweet comments. 
I hope you will hop over and pay Diana a visit ... 
she is sure to inspire you.

She is so kind and so helpful to other bloggers. 
 
  She loves thrifting, collecting and is very knowledgeable about about history and art which she happily shares. 

Friday, March 13, 2015

Antique mirror for master bath remodel

Actually, I bought this mirror many years ago at an Estate Sale for 10¢ ... no typo ... yes ... TEN CENTS. I think they just needed to get rid of it. 


This late 1800's mirror had a lot of issues, but also had a lot going for it.


It hung in storage for a lot of years and just kept deteriorating.

Yes, I had to take all that stuff out of this aisle to get to it.                                            
We were remodeling our master bath and I planned to put a wall of mirrors on the newly planked wall and I wanted to include this one. 

Well ... let me tell you ... after seeing what that wall of mirrors would be reflecting, I quickly changed my mind about a full wall of mirrors. It is the wall directly across from the walk-in shower ... and you know the "rest-of-the-story".

 Regardless; at this point, I needed to restore it or get rid of it. It had a lot of missing pieces of gesso decorations and the mirror was loosing silver. 
 
I just filled in the empty spaces with Hard as Nails wood putty. 


Sanded it to the shape as best I could ... 
painted and antiqued it and called it good.
 I ended up painting it with Behr, Spanish sand, the same color as the wall and antiqued it with Min-wax stain to age it. 
Love the cut-etched arch. 
A paper with French script that fills in the dark area of silver loss did not turn out exactly as planned and that will likely be changed.

I hung it high enough so it mirrors just the head and shoulders of the person getting out of the shower. 


 And here it is hanging on the planked wall in our newly remodeled bathroom. I am standing in the shower but shooting at a angle so you can't see me.

We are finished with this part of bath remodel ... 
except for the barn door which will be hung when the vanity room is redecorated.
   
I had hoped to get the vanity area done before I did these reveals, but just not happening. Life kinda got in the way.

Upcoming blogs ... 
the planked wall ...
the vintage kitchen cabinet in the bathroom ... 
the beautiful walk-in handicap shower ...
the walk-in master closet/dressing room ...
or scroll down the page

the barn door .... (this one may be awhile)

Hope you will come back to see these. 

You can see the before and after of the bathroom here.
or just scroll down one blog.
 
Thanks for staying with me with this lengthy post.
Linking to:
Vintage Inspiration Party
The Shabby Nest Frugal Friday

Funky Junk Upcycled link party

Master bath remodel before and after.Part 1.

 
This large 1980's garden tub with pine tongue and groove surround is pretty ... right !!!  

So happy to say ... 
This blog was FEATURED at DIY by Design
Thanks Sharon, I feel so honored. 


Big area and lots of room to display things. 
I  will miss my chandelier ... but that is okay.

It also had pine tongue and groove surround on the front where the blue/gray foam-core insulation pieces are. They were put there to seal off the area they had to access when we had the plumbing problem in 2013.  We did not make good use of this tub in the twenty-eight years we have lived in this house. I think I was in it one time and had trouble getting out of it then because of a bad back. I really hated the tub, the tiny shower and the whole bathroom. The tub took up so much room and I thought we should put that space to a better use. 
 
I had talked about it several times ... and finally convinced Mr.Z and our contractor/cabinet maker son, that we needed to remodel the bathroom now and make it accessible for the elderly and handicap.  


The entire room is about 7' x 10' and this unused tub with surround took up almost half of that space. 

(look at the picture on the right) .... the new shower wall to the right of the window and behind the bench is were the edge of the tub was. 
The old shower measured 41"x 41" on the outside.  
About 36" inside ... (too small for a handicap bath chair) 
There was thirty-two inches between the tub and shower. 

The metal garden bench was taken from the back porch. All I did was remove the fabric, wash it, add thicker padding and put it back on, leaving the chippy, rusty frame as it was. The pedestal and the cement fountain piece were taken from the entry and the white floor vase was a 25¢ thrift buy.
I replaced the metal mini blind with faux wood one from Lowe's.


See the big white plaster place on the shower wall ?  

That is where the wall was repaired when they changed the plumbing. Yes, shameful, I know ... it sat like that for over a year. I just did not have the heart to redecorate when I hated the bathroom. I wanted that big cabinet hanging over the toilet GONE from the year we bought the house. That got voted down, so I lived with it.

  ... installed a new Kohler toilet and moved the old one to the main bath. Both are comfort or handicap height. 
Love this new one. It has a unique flushing system.

We installed wood planks on the wall behind the toilet and to the corner where the shower was. 
(more about that later) ...  

Glass shower door is gone and no more glass doors to clean ... in fact, no shower door at all right now.


See all that open space ... room to move around and even dress in here if we want to.  The fabric on the garden bench had the perfect jade colored flower to match the old kitchen cabinet that I painted with Behr aged jade. 

I will explain the different color floor tile in another blog.

Love this vintage kitchen cabinet in here. It had been in storage for many years and needed to be restored. We put it back together and modified it to meet our needs. The roomy deep drawers provide space for underwear and the bottom one for extra toilet tissue ... Can you guess where the dirty clothes hamper is?  
(Check out my blog on this coming soon).

I shopped the house, storage and yard for almost everything in here except the metal shorting shelf above the toilet.  

 Just a few other things were bought especially for this room.


Watch for more blogs coming soon on ...
... gutting the bathroom and putting it back together
... vintage kitchen cabinet
... the decorations
... DIY toilet tissue holder
 ... Kohler chrome shower fixtures ... 
... wood planked wall
... hanging a barn door


Thanks for staying with me on this long post ... part 2 will follow soon. 

Blessings.


Linking to: 

DIY by Design: Fall into Fall Linky Party 238

The Dedicated House.Make It Pretty Monday week 155


Coastal Charm Show & Share No. 285My Show and Share Party

Vintage Inspiration Party
The Shabby Nest Frugal Friday 


Wednesday, March 11, 2015

Master Closet Remodel and installing wood floor.


Remodeling the MASTER BATH ... 
closet ... vanity room and shower


Our master bath is actually three rooms  just off the bedroom.

... the walk-through vanity room
 
... the walk-in closet
  
... the shower/toilet room 


These rooms had not been totally 'put back together' and redecorated since the damage done to the walls when we had the total house plumbing replacement in September of 2013. I just could not spend time and money redecorating when I hated the rooms as they were.   


the CLOSET
 We started working on the closet in September 2014 ...

It is an 8'x9' carpeted walk-in closet and dressing room.


We removed everything in there to the guest bedroom; our bedroom or wherever we could find an empty spot. 
The guest bed was piled high with clothes and junk was everywhere all of October, November,  December and most of January.  
We purged and donated a lot of clothes and shoes to Hospice and CAM (Christian Assistance Ministry).

You can see that we stored more stuff than just clothes.

 When the call came from our contractor Son that his demolition crew would be here in two days to start gutting the shower/tub/toilet room, 
the closet was closed and put on hold.

***link to Part 1 of the shower room can be seen below.

October and most of November, both of us were dealing with health issues with Mr. Z. spending three days in the Hospital. This time was also spent removing the dust created by the remodel of the shower ... getting ready for Thanksgiving and Christmas ... we also made the changes in the rods and shelves; painted the entire closet and installed the two storage shelves. Then we were waiting on the guys to come remove the carpet and install the wood floor.
 
 
Remodeled shoe-shelf was hung on the wall.

Floor is done and we are starting to move back in.  


You can see how we made the top shelves level in the corner

... moved the rod up and added a short rod between the wall and the shoe shelf.


AFTER
We still use the shelf above the rod to store stuff, but looks a little neater now. I am also slowly replacing the colorful plastic hangers with clear plastic hangers.

Behind the door ...
I used a vintage chrome-plated towel rod for hanging scarves and a thrifted tie rack. 
Love the mounting brackets on this old rod. 

The front of the door has an over-the-door mounted mirror with belted brackets. (see Belted Brackets link below)


This is the builder made, wall mounted shoe shelf with five slanted shelves ...  useless !!!

We removed it from the wall ... took it completely apart ... made the shelves flat; painted it white and attached it to the wall on the opposite wall.
And you can see, it has become a useful shoe shelf. 

This is the free-standing shelf  that we put in the place of the mounted slanted shoe shelf.                                                                        It had been used for storage in the garage. We painted it white and added legs so it would be easy to clean under. It still holds the same three pair of Mr. Z's shoes and room for a lot of other items.We moved our socks to baskets and bins and freed up two large drawers in our vanity room. 

 
This part of the rod was designated for long skirts and dresses.  There is still lots of room under them for my old painted trunk, blankets and such.  
Picture below is the same corner before. 


  BEFORE pictures of what was stored on the shelf above the rod.

Little up-side-down stool waiting to be recovered ... how many years?

Now ... I hope I can just remember where I put all this stuff.  


After of the shelf above.

We were also able to move our winter coats in here from the tiny hall closet.

We are so happy with the way this turned out. 
Just hope it will stay organized. 
and YES ... we have a ceiling fan in the closet. 


Before 

After


 Thanks for the visit ... hope you will say hello before you leave.


Belted Brackets  
over-the-door mounted mirror can be seen here.


Bath remodel-before-and-after. Part 1 


Linking to: 
It's Overflowing
ItsOverflowing

The Sunday Showcase Party By Stephanie Lynn


Related Posts Plugin for WordPress, Blogger...